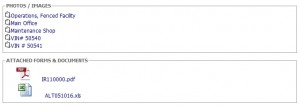
Last week I encountered a situation where I wanted to replace images on a Domino generated webpage. I am sure you all know what doc links look like by default when rendered by the Domino HTTP task:

By adding a few lines of jQuery to the form, you can manipulate the image source, as well as the CSS class and other attributes. This allows you to modify a page served by the Domino HTTP task almost as much as you like.
Below is the code I used to modify what you see above into something that I found a little bit nicer.
        $("img").each( function() {
        var t = $(this);
        imgicon = t.attr("src");
        if (imgicon == "/icons/doclink.gif") {
           t.attr('src', '/applications/losscontrol.nsf/icon_picture.gif');
           t.addClass('photoicon');
        }
        if (imgicon.indexOf("Attachments") > 1 ) {
           t.attr('src', '/applications/losscontrol.nsf/icon_attach.gif');
           t.addClass('attachmenticon');
           t.attr('height','16');
           t.attr('width','16');
        }
    });
    $("a").each( function() {
        var t = $(this);
        url = t.attr("href");
        if (url.indexOf("$FILE")>0) {
           t.removeAttr("style");
           t.addClass('attachmentLink');
           t.outerHTML = t.outerHTML + "<br>";
        }
    });
    var plink = $('#photolinks').html();
    plink = plink.replace(/<br>/i,'');
    plink = plink.replace(/<\/a><font\b[^>]*>/gim,'<span class="photoLink">');
    plink = plink.replace(/<\/font>/gim,'</span></a>');
    $("#photolinks").html(plink);

    var alink = $('#attachmentlinks').html();
    alink = alink.replace(/<\/a>/ig,'</a><br>');
    $("#attachmentlinks").html(alink);
What I am doing is to loop through all img tags on the page, and identify the ones that are doc links (using the file name for the icon). I replace the src attribute of those links with a different icon I added as an image resource to the database. I then set the class name for the link, so I can manipulate the look using CSS.
I also look for any src attribute containing the field name “Attachments”, which is where the attachments (if present) are located. I change the icon from the one generated by Domino to another image resource in the database.
The next section of the code will loop through all anchor tags and check if the link includes “$FILE”, indicating it is an attachment. If that is the case, I remove the Domino generated style attribute, set a class name and append a line break to the end of each link.
I then perform some string replacements to remove the font tags that Domino generate automatically when rendering rich text fields. I replace the font tags with a span (containing a class name) so I can style the look of the link later, and also move the </a> tag to after the link text. The last thing I do is to add a line break after each attachment link.
Here is the result:

Hope this can help anyone. And if you wonder, I am using the fieldset tag to create the box around each set of icons.

Pingback: HTML manipulation with dojo | XPages, a new way of development
Where do you put that script: on the onLoad event, onDocumentReady, at the bottom of the document???
Either at the bottom of the page, so it execute after the page has been fully loaded, or (since I am using jQuery) use the .ready() event.
http://api.jquery.com/ready/